SmartVan Resistive Sensor Setup Guide

Powering the device

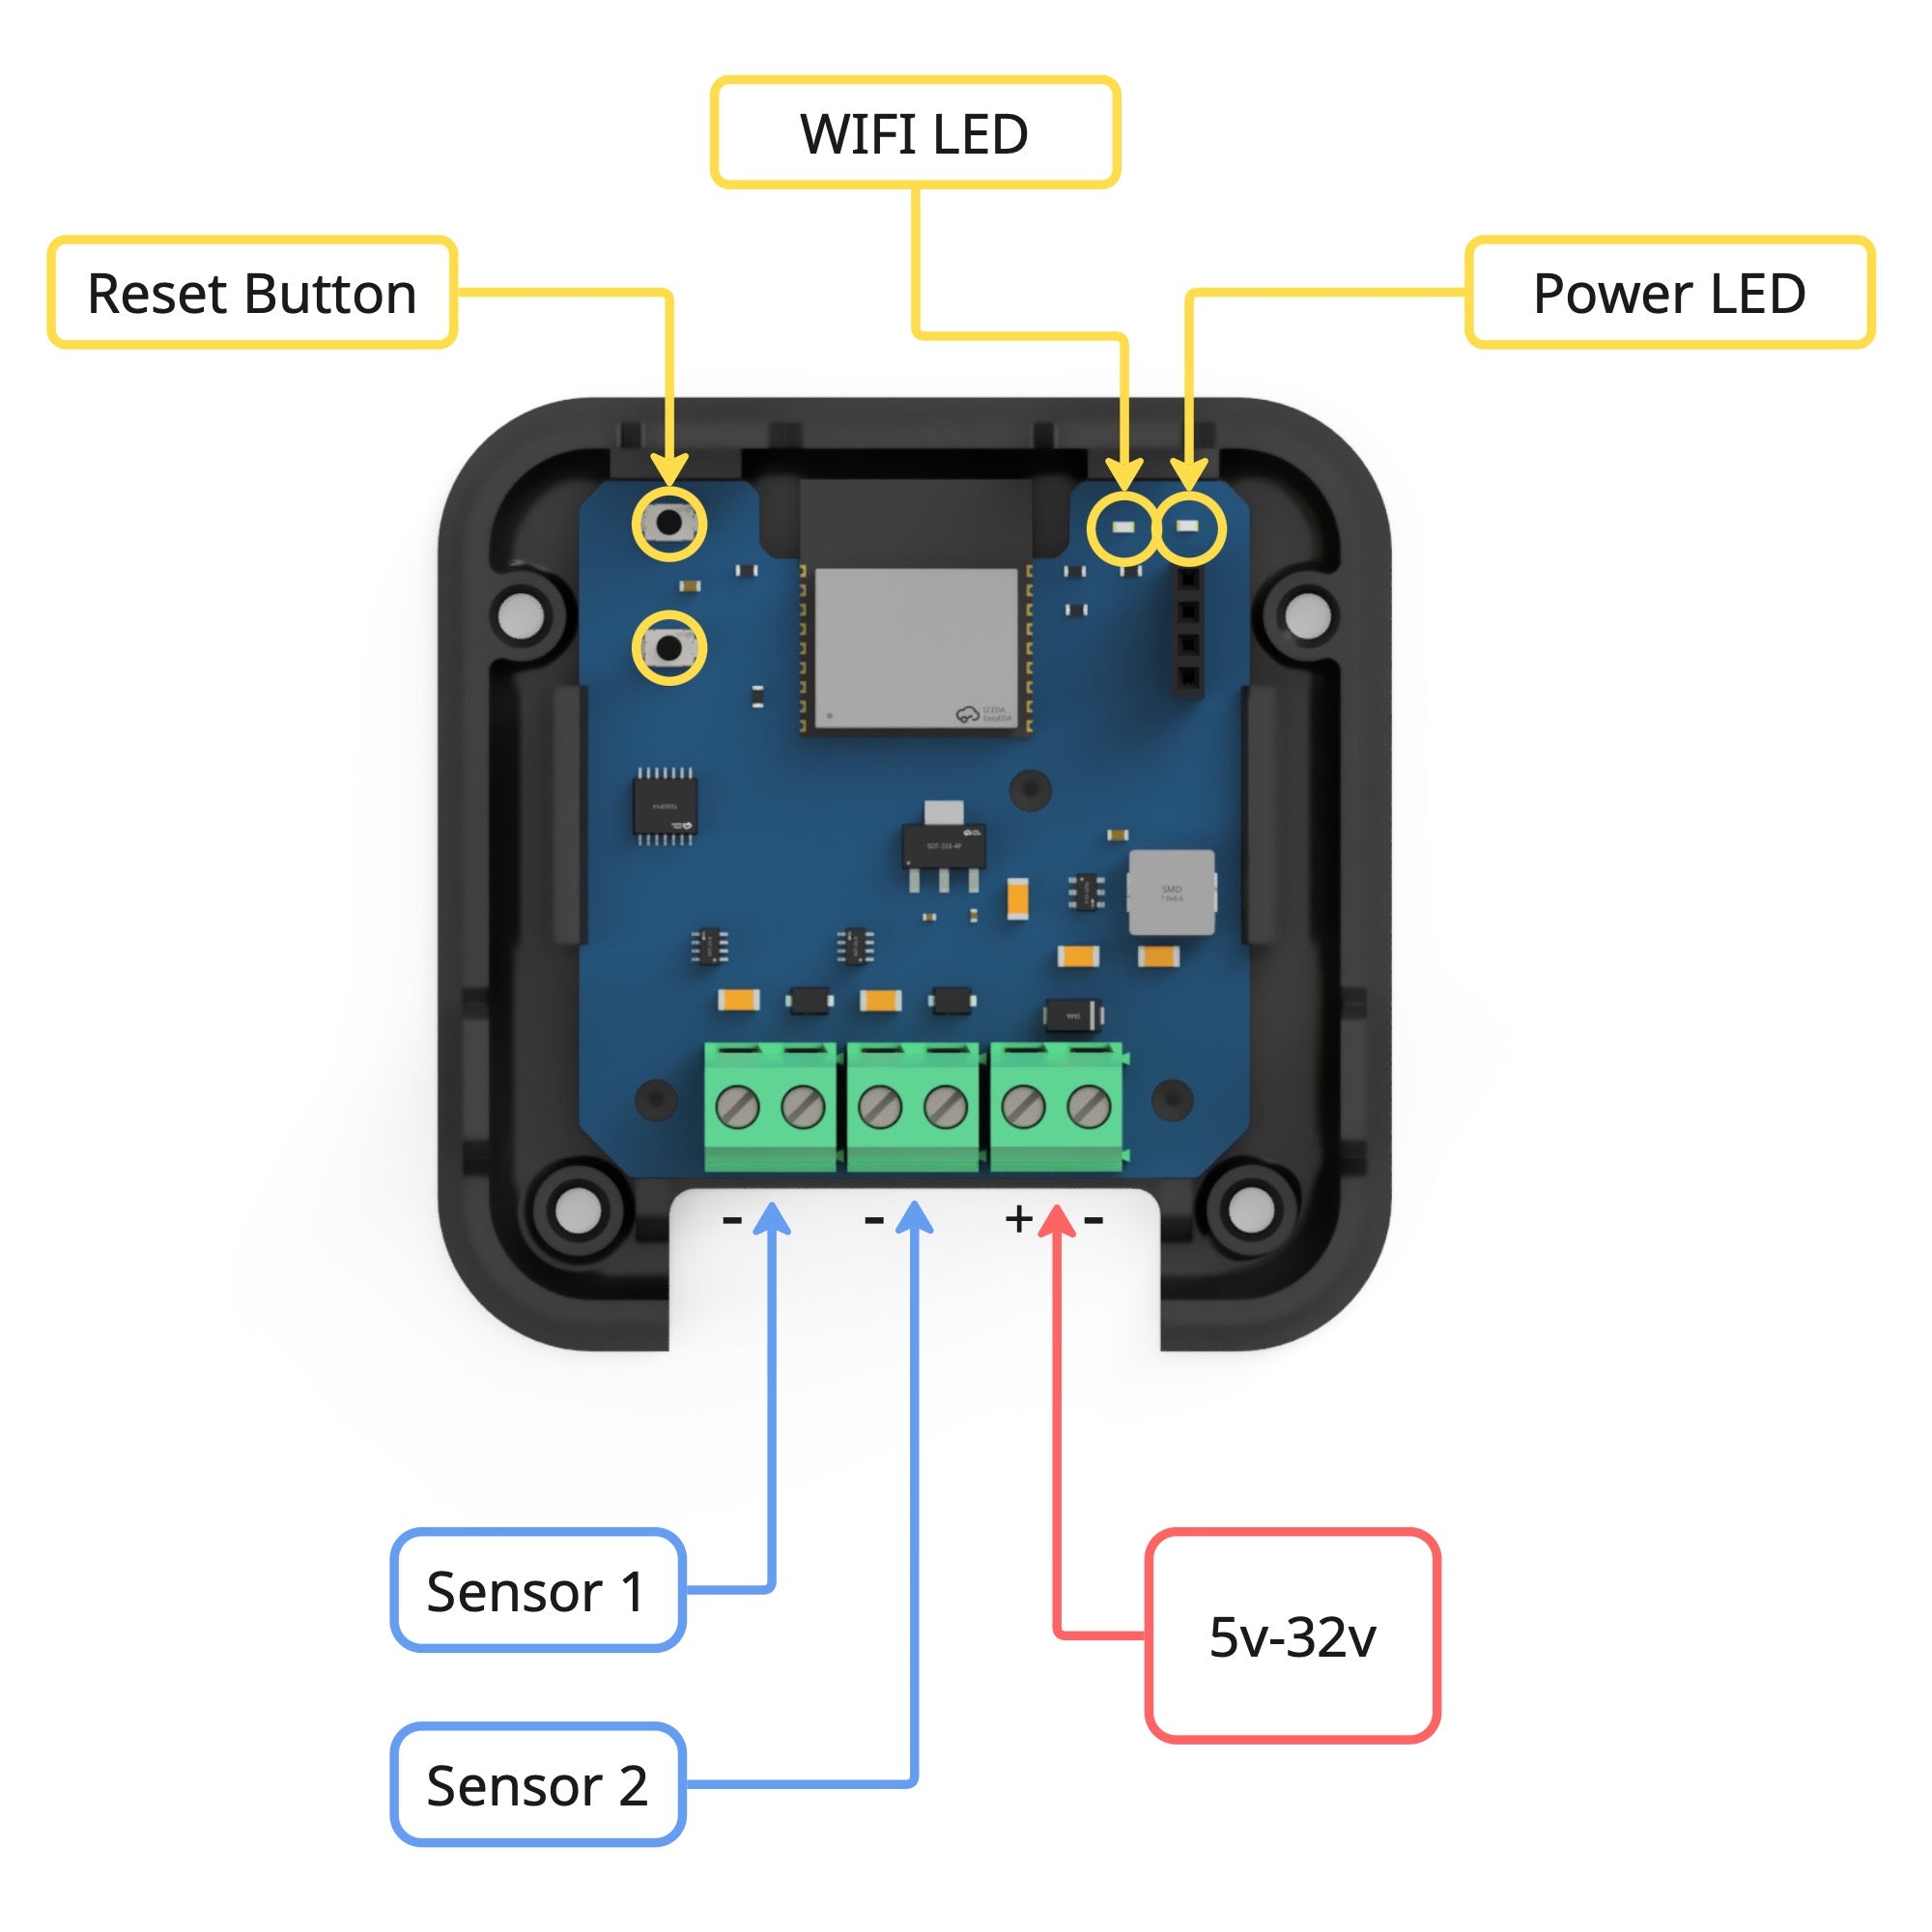
  1. Connect the device to a power supply (5V - 32V).
  2. You should see a red LED indicator. It will blink every second to indicate that the module is powered on and disconnected from Wi-Fi.
  3. If the device has never been connected to Wi-Fi before, it will immediately create its own access point.

Note: do not supply any voltage exceeding 3volts to either of the input terminals.

Configuring Wifi

When you power on the device for the first time wifi indicator will blink every second until it is connected to a network. To connect the device to your network you must first connect to the access point created by device itself.

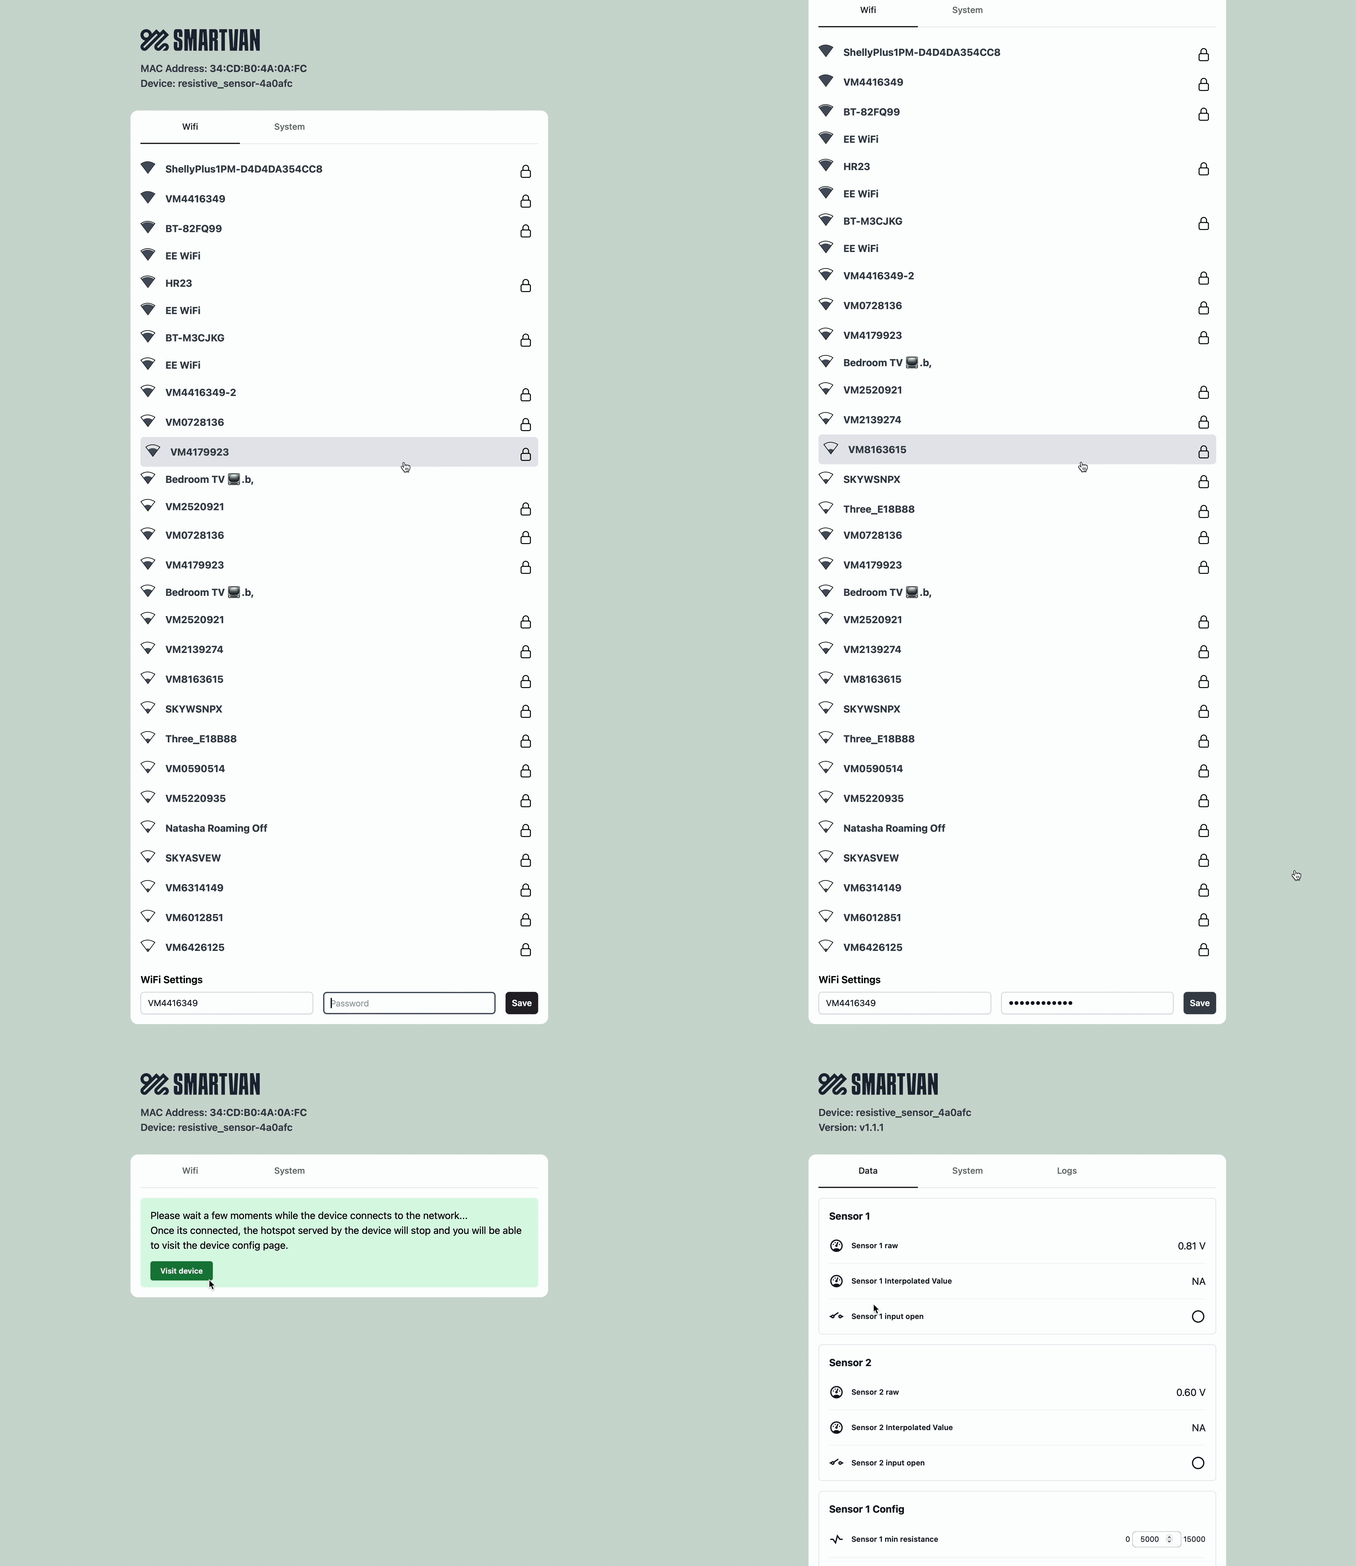
  1. First on your phone / computer open your Wi-Fi settings and scan for local networks.
  2. Look for an access point named resistive_sensor-xxxxx and connect to it.
  3. Once connected to the device's access point, open a web browser and go to 1.2.3.4.
  4. The Wi-Fi setup page will load, displaying available networks.
  5. Select the Wi-Fi network that your Home Assistant hub is connected to and enter the password.
  6. Click Connect. The device will then stop serving its access point and attempt to connect to your selected wifi network.
  7. Your laptop or tablet will then disconnect from the device and reconnect back to your original wifi network and the device hotspot will no longer be visible.
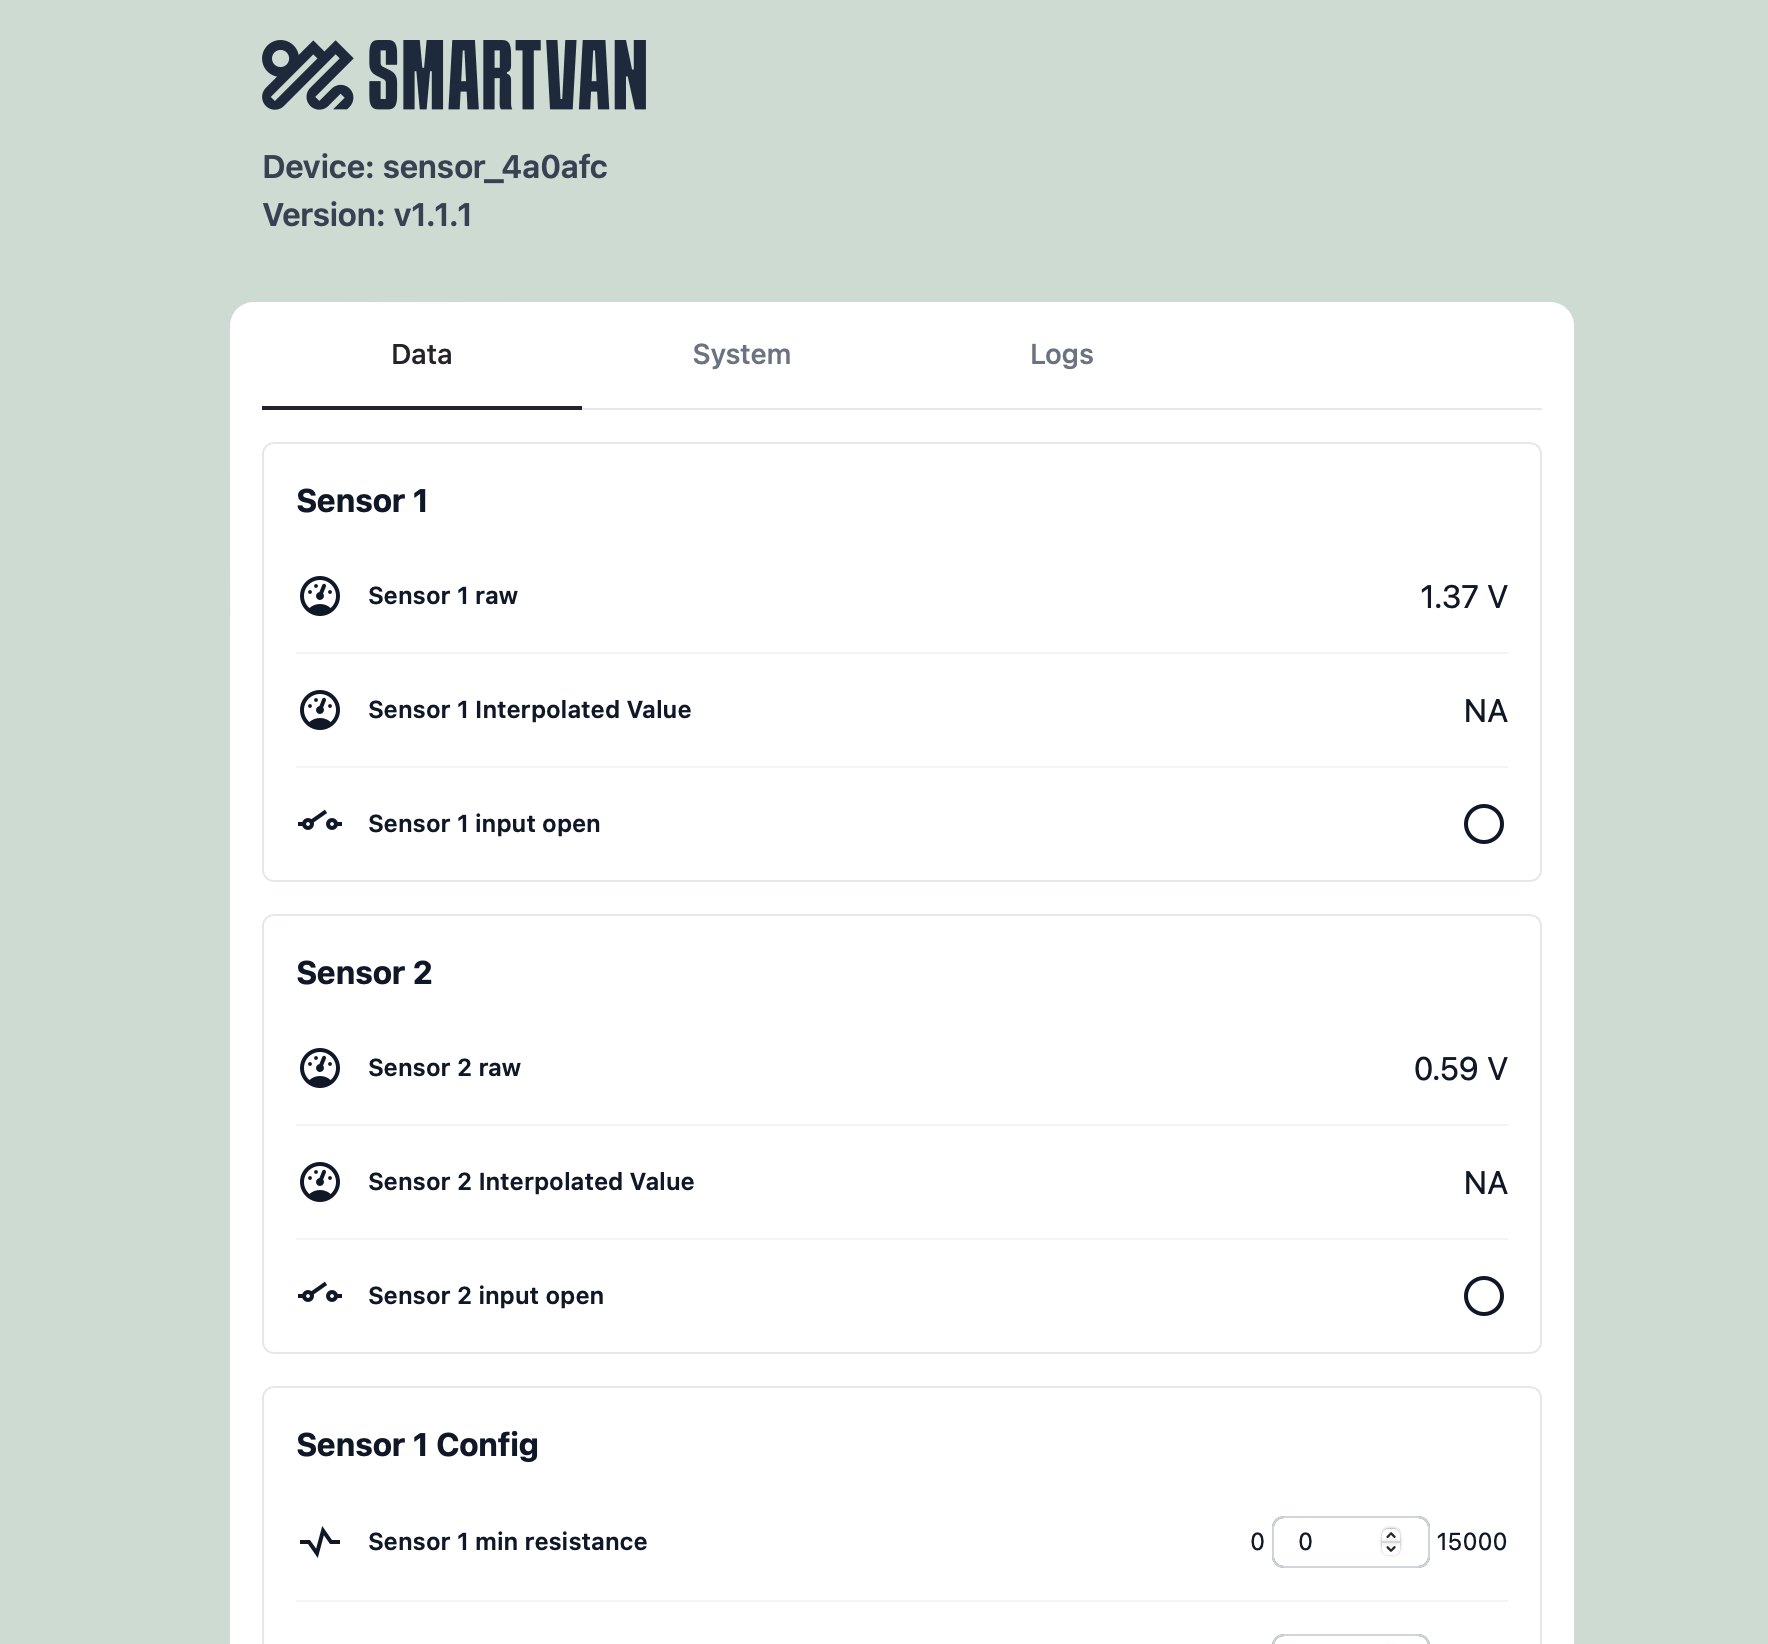
  8. To check if the connection was successful, visit resistive_sensor-xxxxxx.local in your browser where you will see information about he device and some config options

View the device config page

To check if the connection was successful, visit resistive_sensor-xxxxxx.local in your browser where you will see information about he device and some config options, logs etc.

View more information about config options: Click here

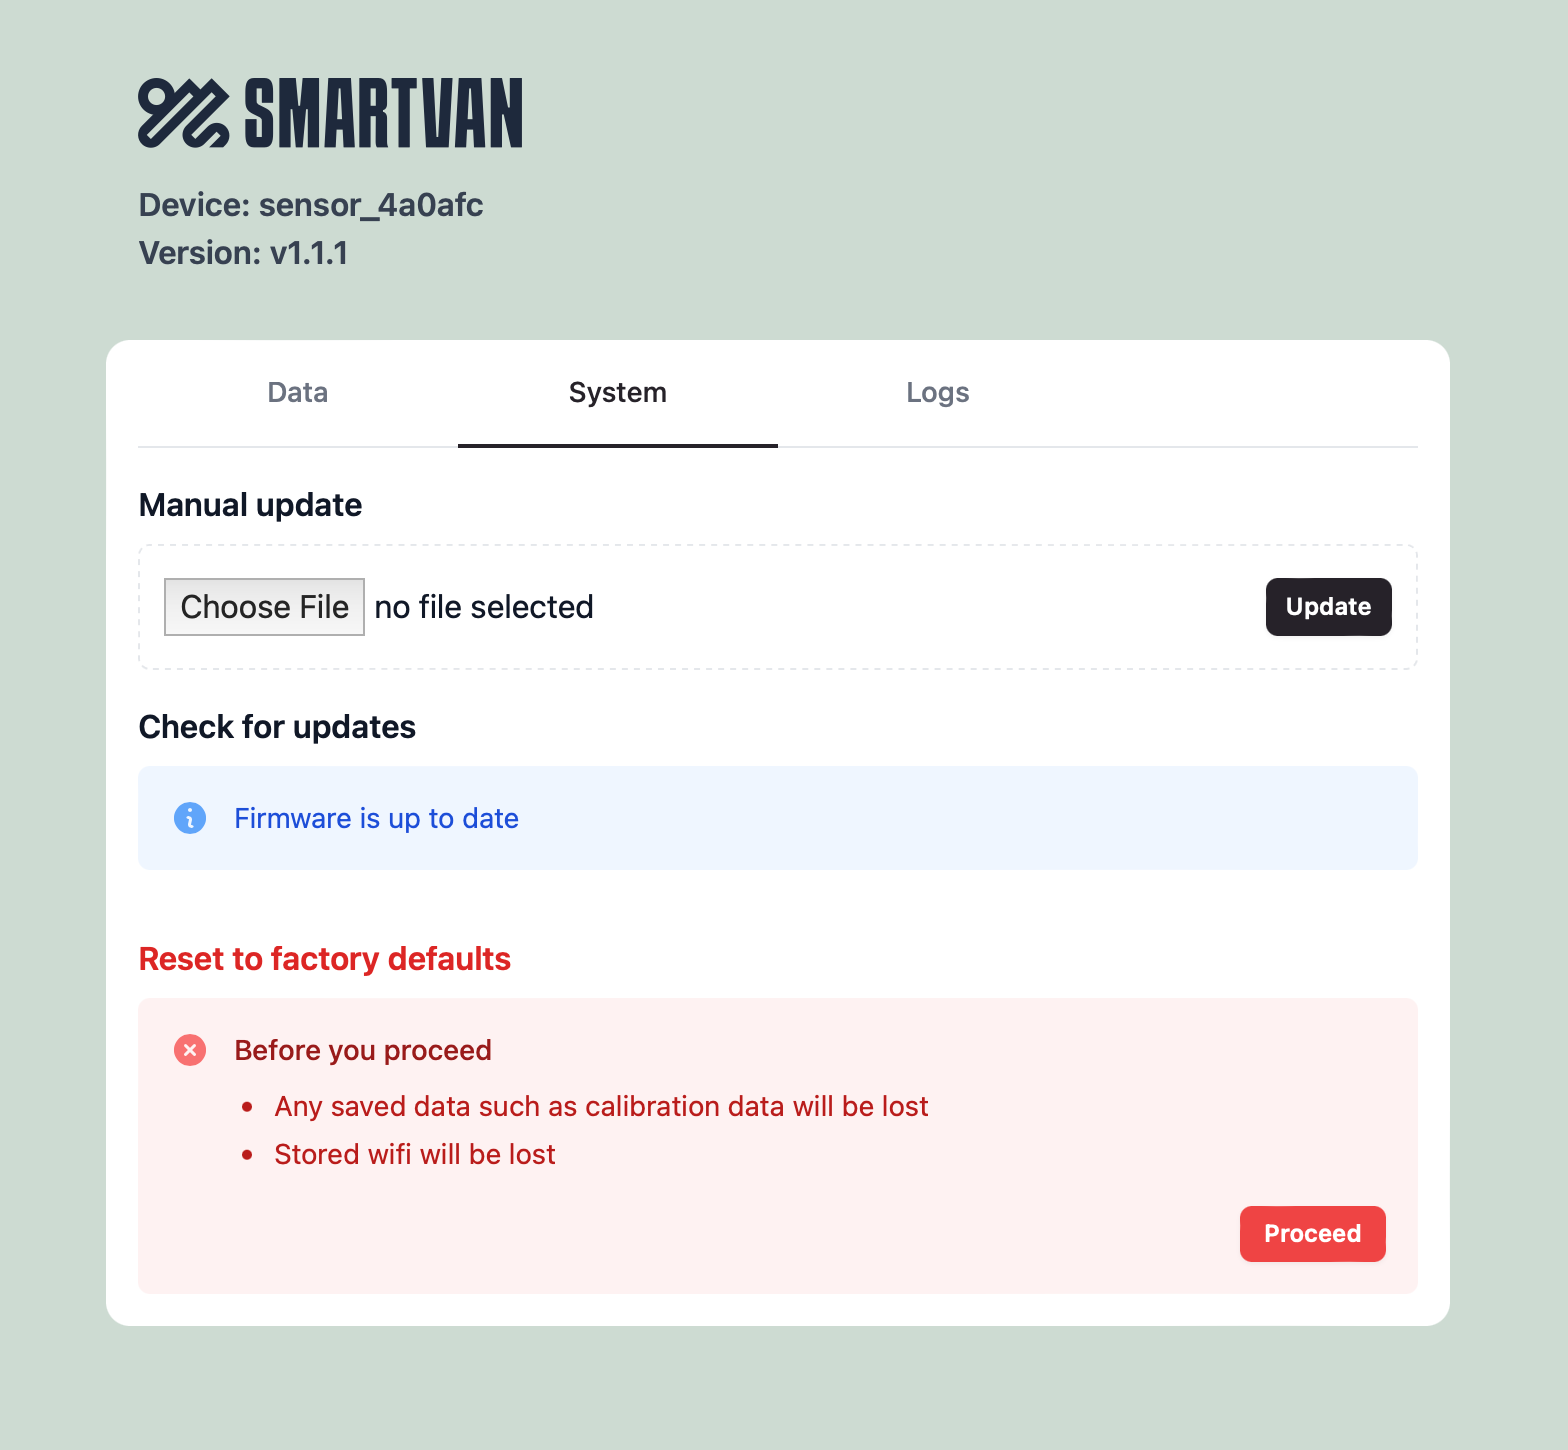
Check for updates

Once the device has connected to your wifi and is connected to the internet, go to the System tab and check for updates to ensure you have the latest firmware.

Adopting the Device in Home Assistant

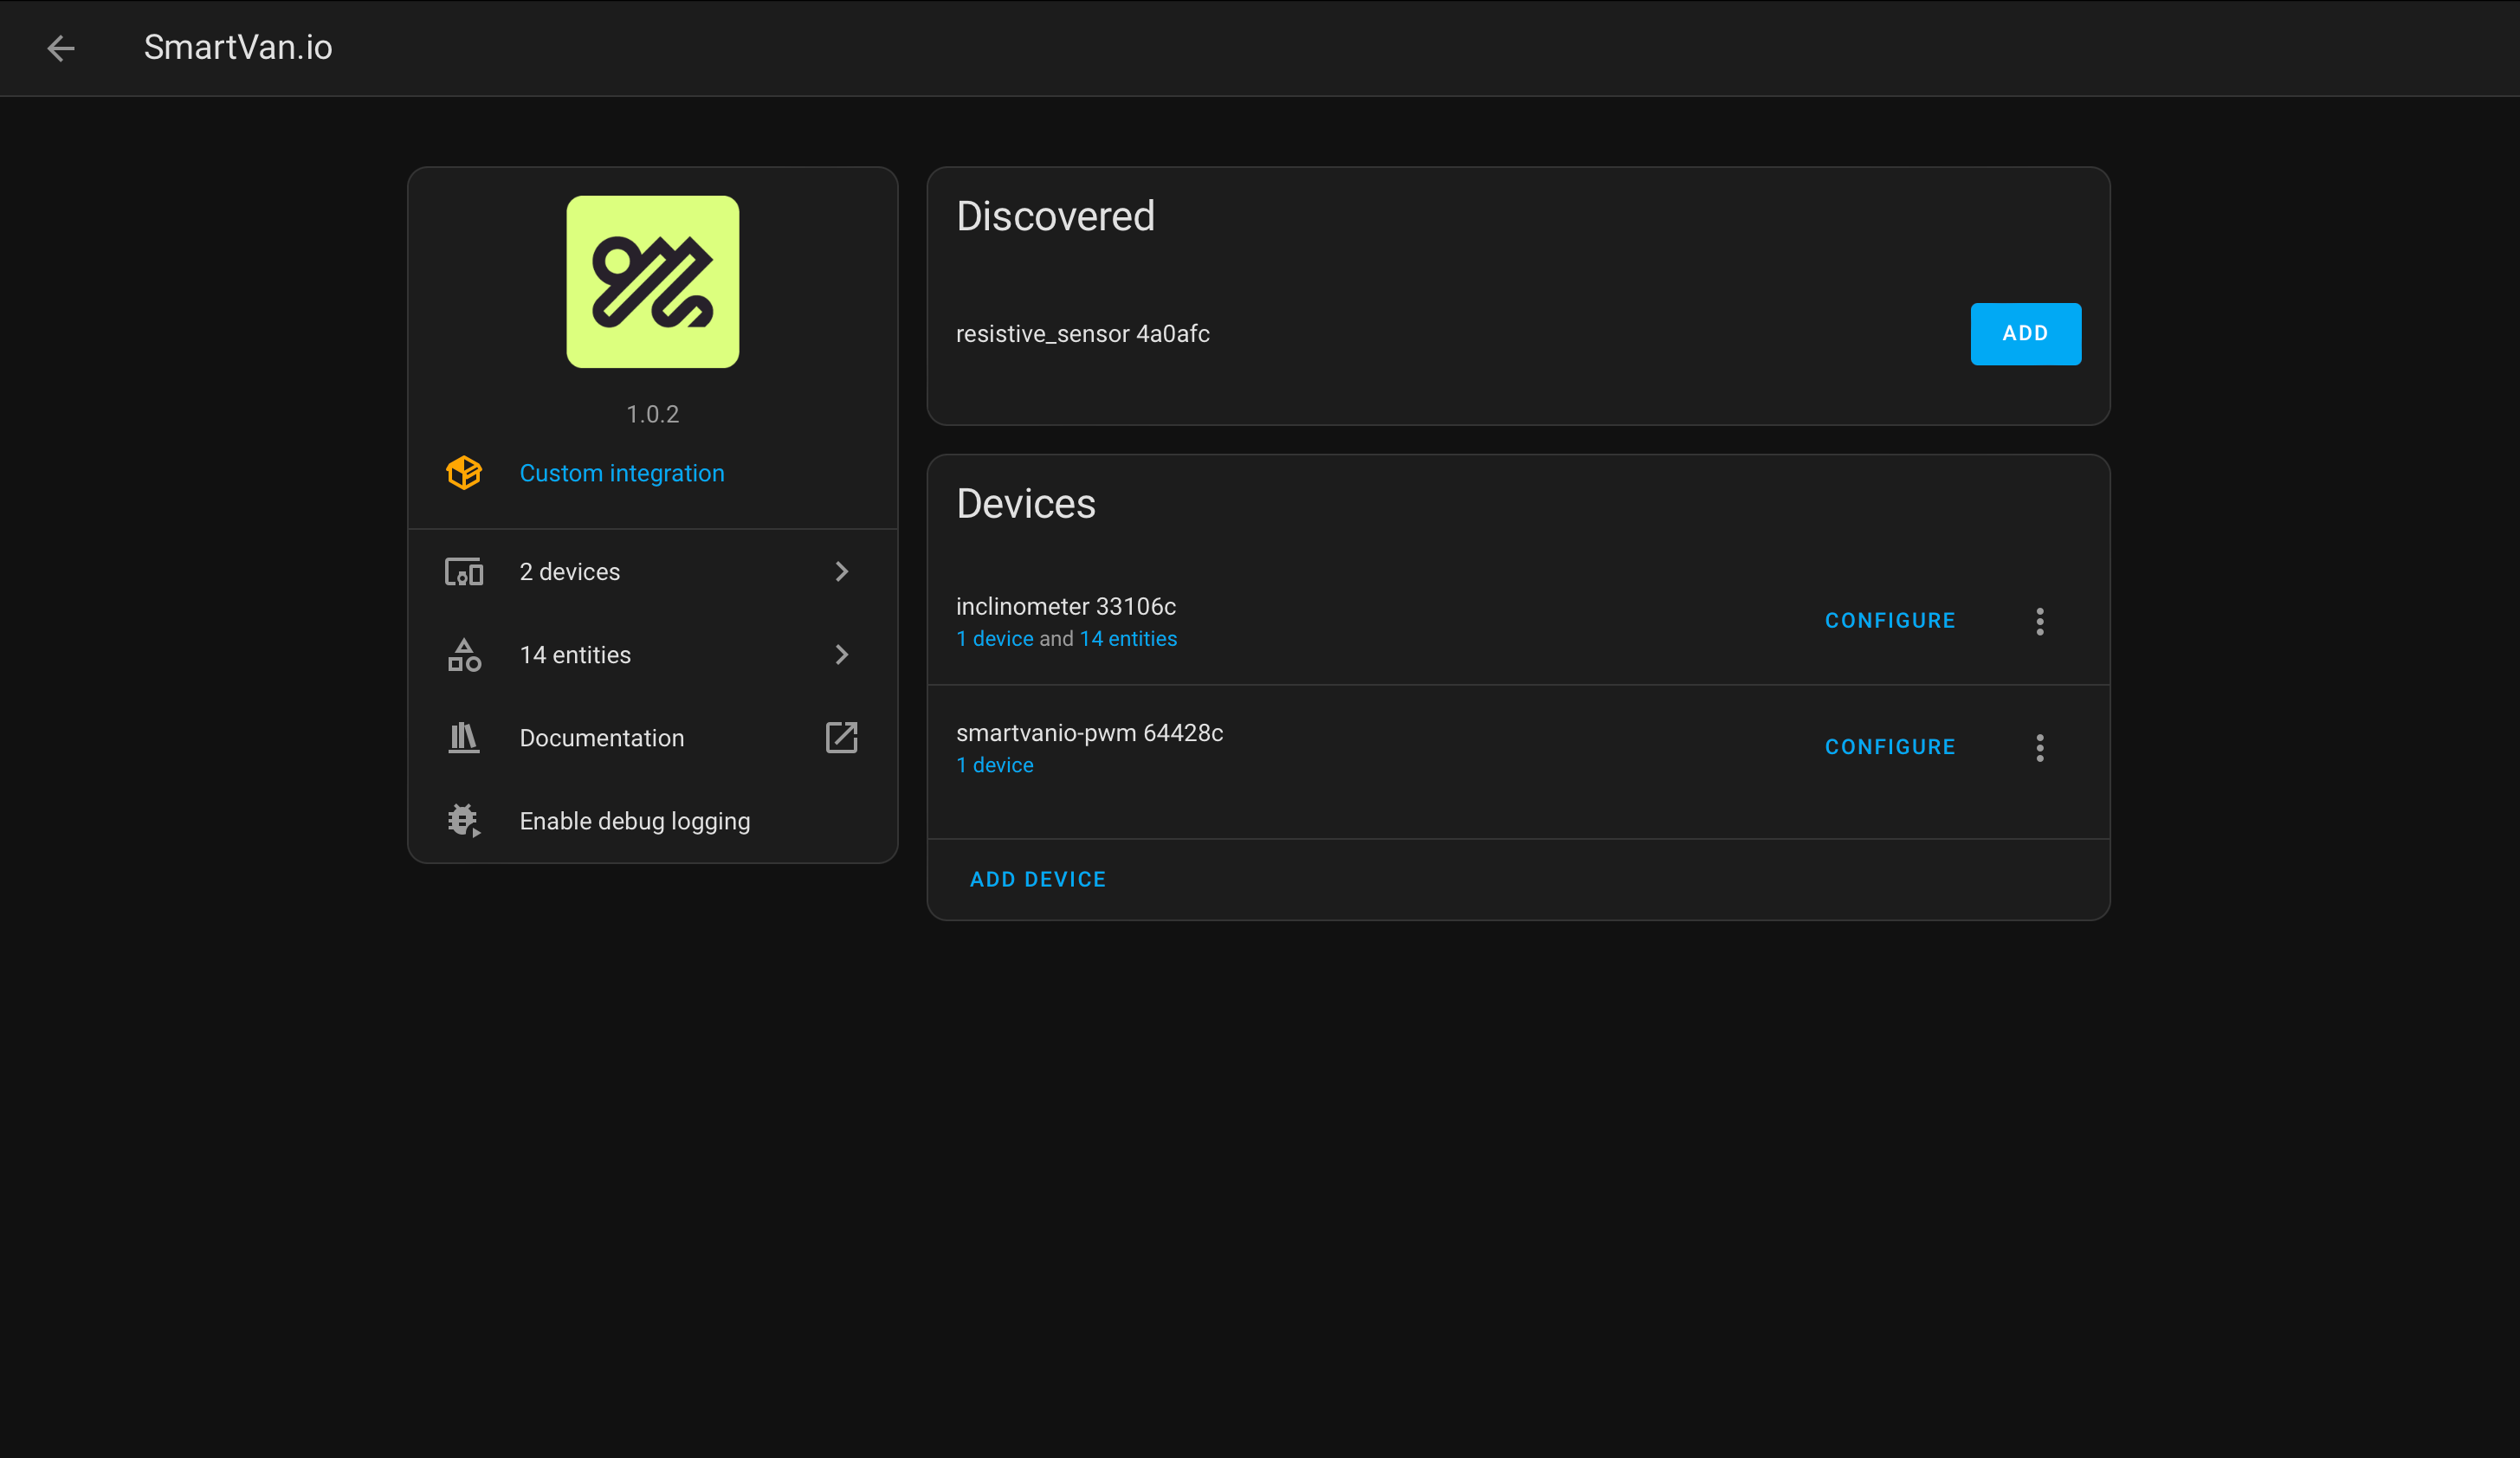
In order for the device to be discovered in HomeAssistant to and for the sensor interpolation to function you must first install the SmartVan.io integration

Open your Home Assistant instance and open a repository inside the Home Assistant Community Store.

Automatic Discovery

  1. Home Assistant will detect the device on the network and notify you that it is available for adoption.
  2. Open the Notifications section from the sidebar.
  3. Click Check it out, which will take you to the Devices & Services page.
  4. Locate the device under Discovered, then click Configure.
  5. In the dialog, click Submit.
  6. You will be prompted to assign the device to an area—choose any location you prefer.

Manual Adoption

  1. Go to Settings > Devices & Services.
  2. Click Add Integration (bottom right corner).
  3. Search for SmartVan.
  4. In the Host field, enter the ip address or hostname of your device and click Submit.
  5. Assign the device to an area of your choice.
Installing the custom card

Using HACS (Recommended)

  1. Ensure you have HACS (Home Assistant Community Store) installed.
  2. Click on the install link below

Open your Home Assistant instance and open a repository inside the Home Assistant Community Store.

Manual Installation

  1. Download the card files from the provided link.
  2. Place them in your Home Assistant www folder.
  3. Add a reference to the card in lovelace resources.

Adding the Card to the Dashboard

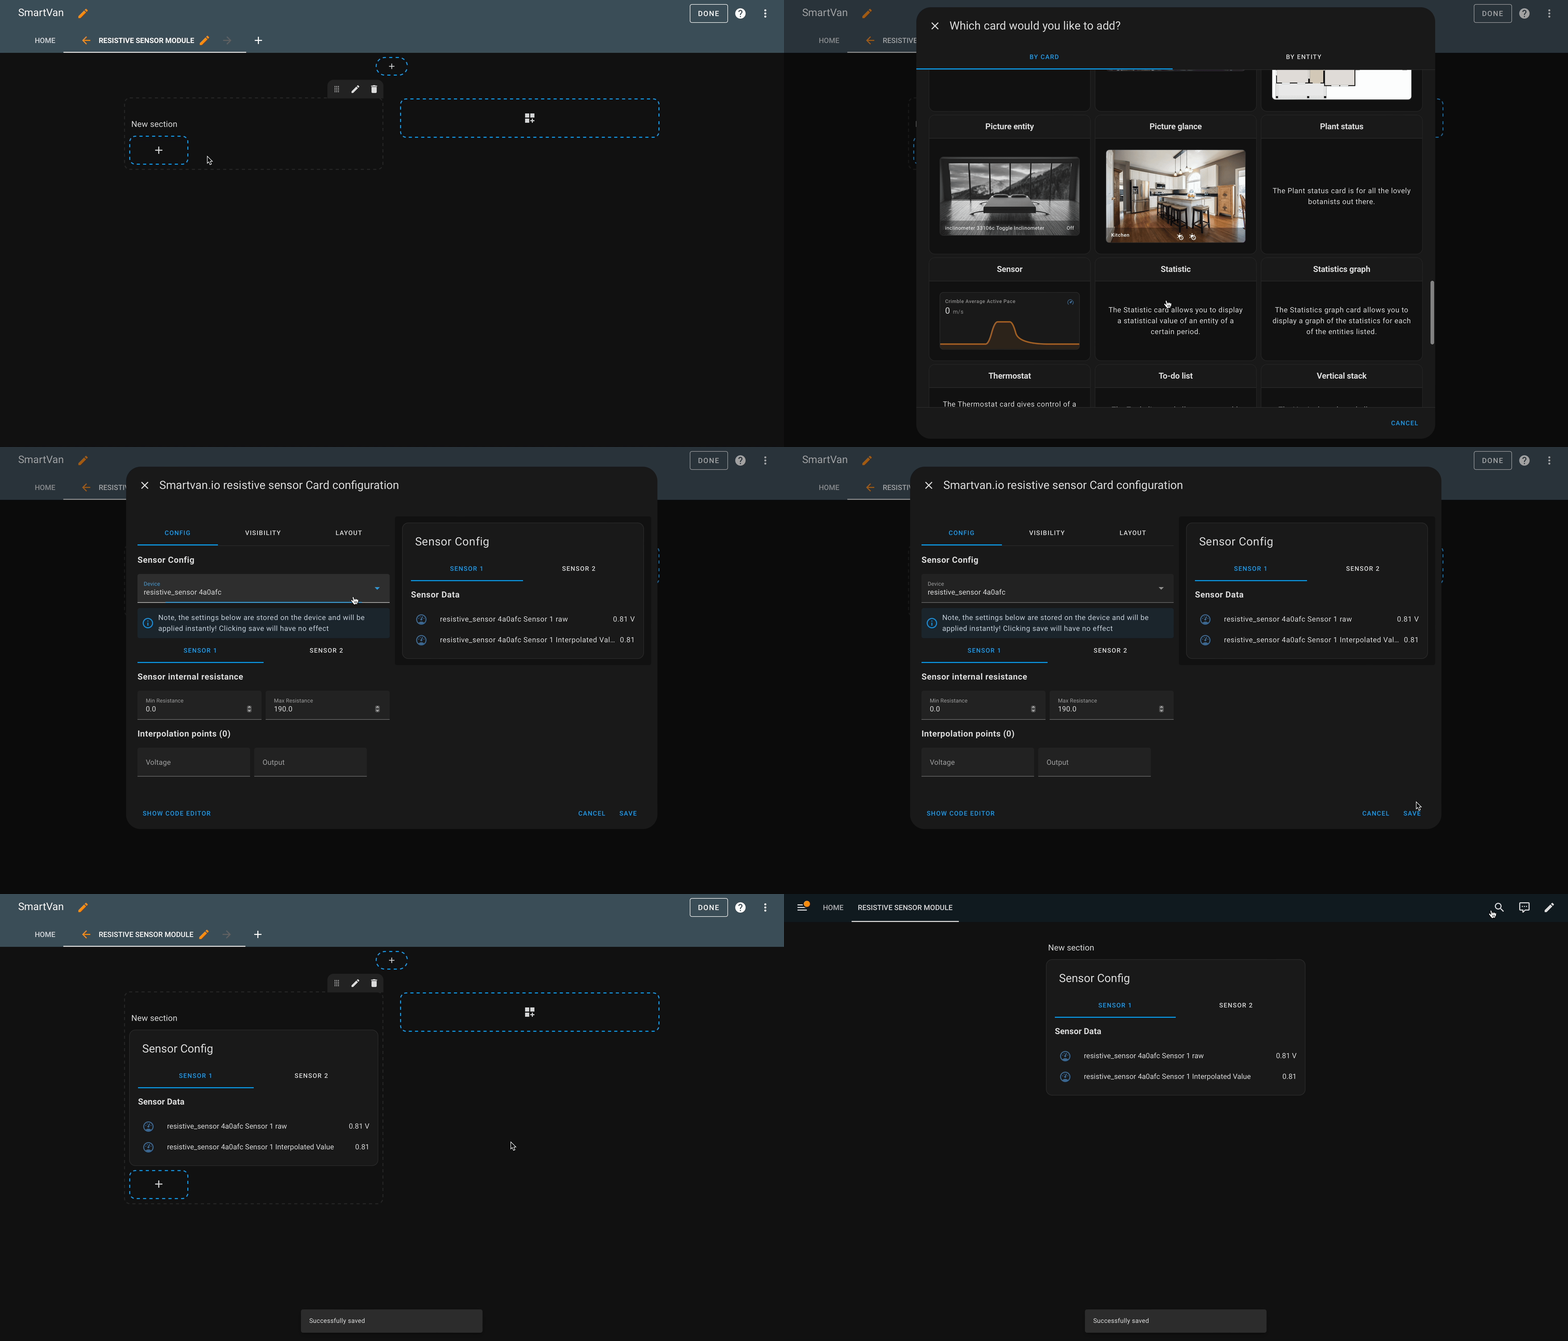
  1. Navigate to your Home Assistant dashboard.
  2. Click Edit Dashboard.
  3. Click Add Card and select the SmartVan card.
  4. Configure the card settings as needed.
  5. Click Save to finalize the setup.

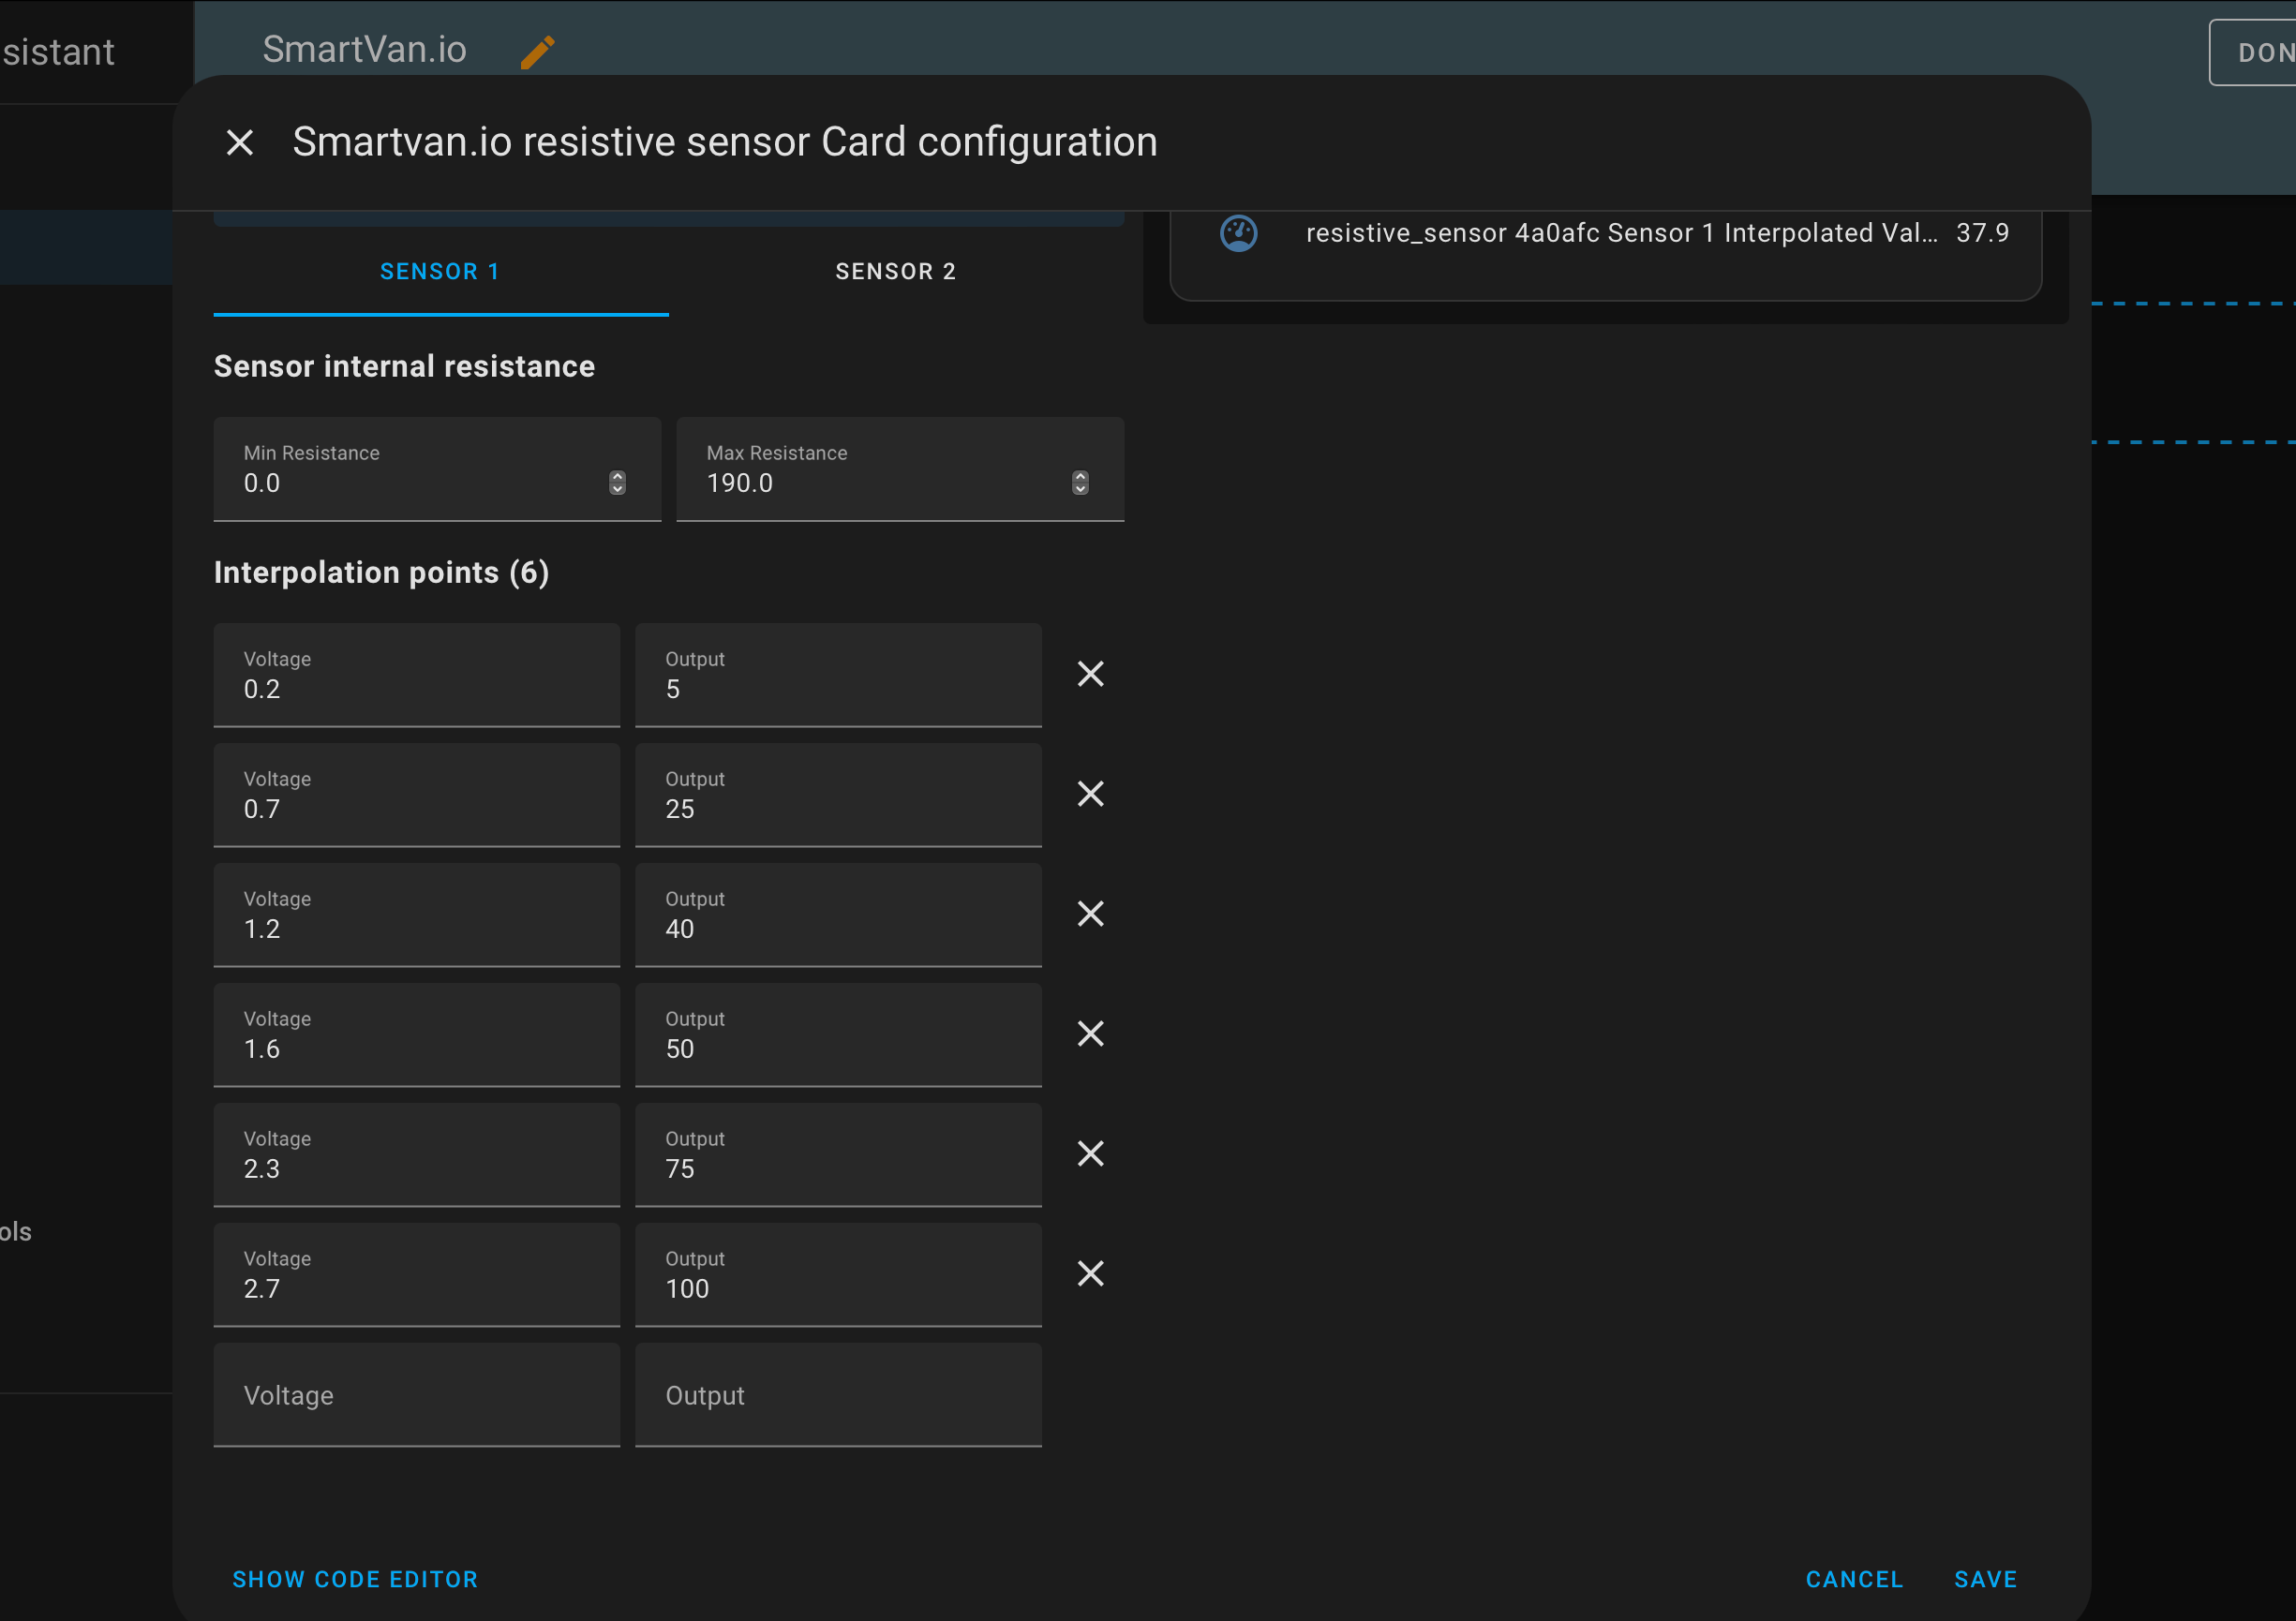
Setting the resistance levels for your sensor.

To ensure you are able to measure the largest voltage range possibl,e for the best accuracy you need to define a min and max resistance level. This will vary from sensor to sensor so you will need to check your sensors spec sheet.

Note: The water tank probes found on Amazon which are quite popular operate between min: 0 and max: 190ohms.

Adding interpolation points

For a water tank probe, to get data points we can simply move the float up and down and take the voltage readings. This might be a tricky if already installed but if you know the capacity of your water tank you could fill it up with known amounts and estimate the level that way.

With the custom card you can enter these data points to map a raw voltage value to a meaningful output value

Note: If the interpolated value is equal to the raw value even after adding interpolation points, try reloading the integration.

Calibration & Interpolation

A resistive sensor works by passing a fixed voltage through some sort of variable resistor and then measuring the voltage at the other side. This raw voltage value alone isn't too helpful as it doesn't describe much in the context of what you're trying to measure. How much water is 2.3v anyway??

In order to give some meaning to this raw voltage value so we can use it in our dashboards we can use something called "interpolation". Interpolation is a way to estimate values based on where it lies between some existing known data points. For example, let's say we have some data points that say 0.5v = 50%, 0.8v = 90%, 1.2v = 100% and our sensor reading is 1v. It would be fair to assume that our interpolated value is somewhere between 90% and 100%. 

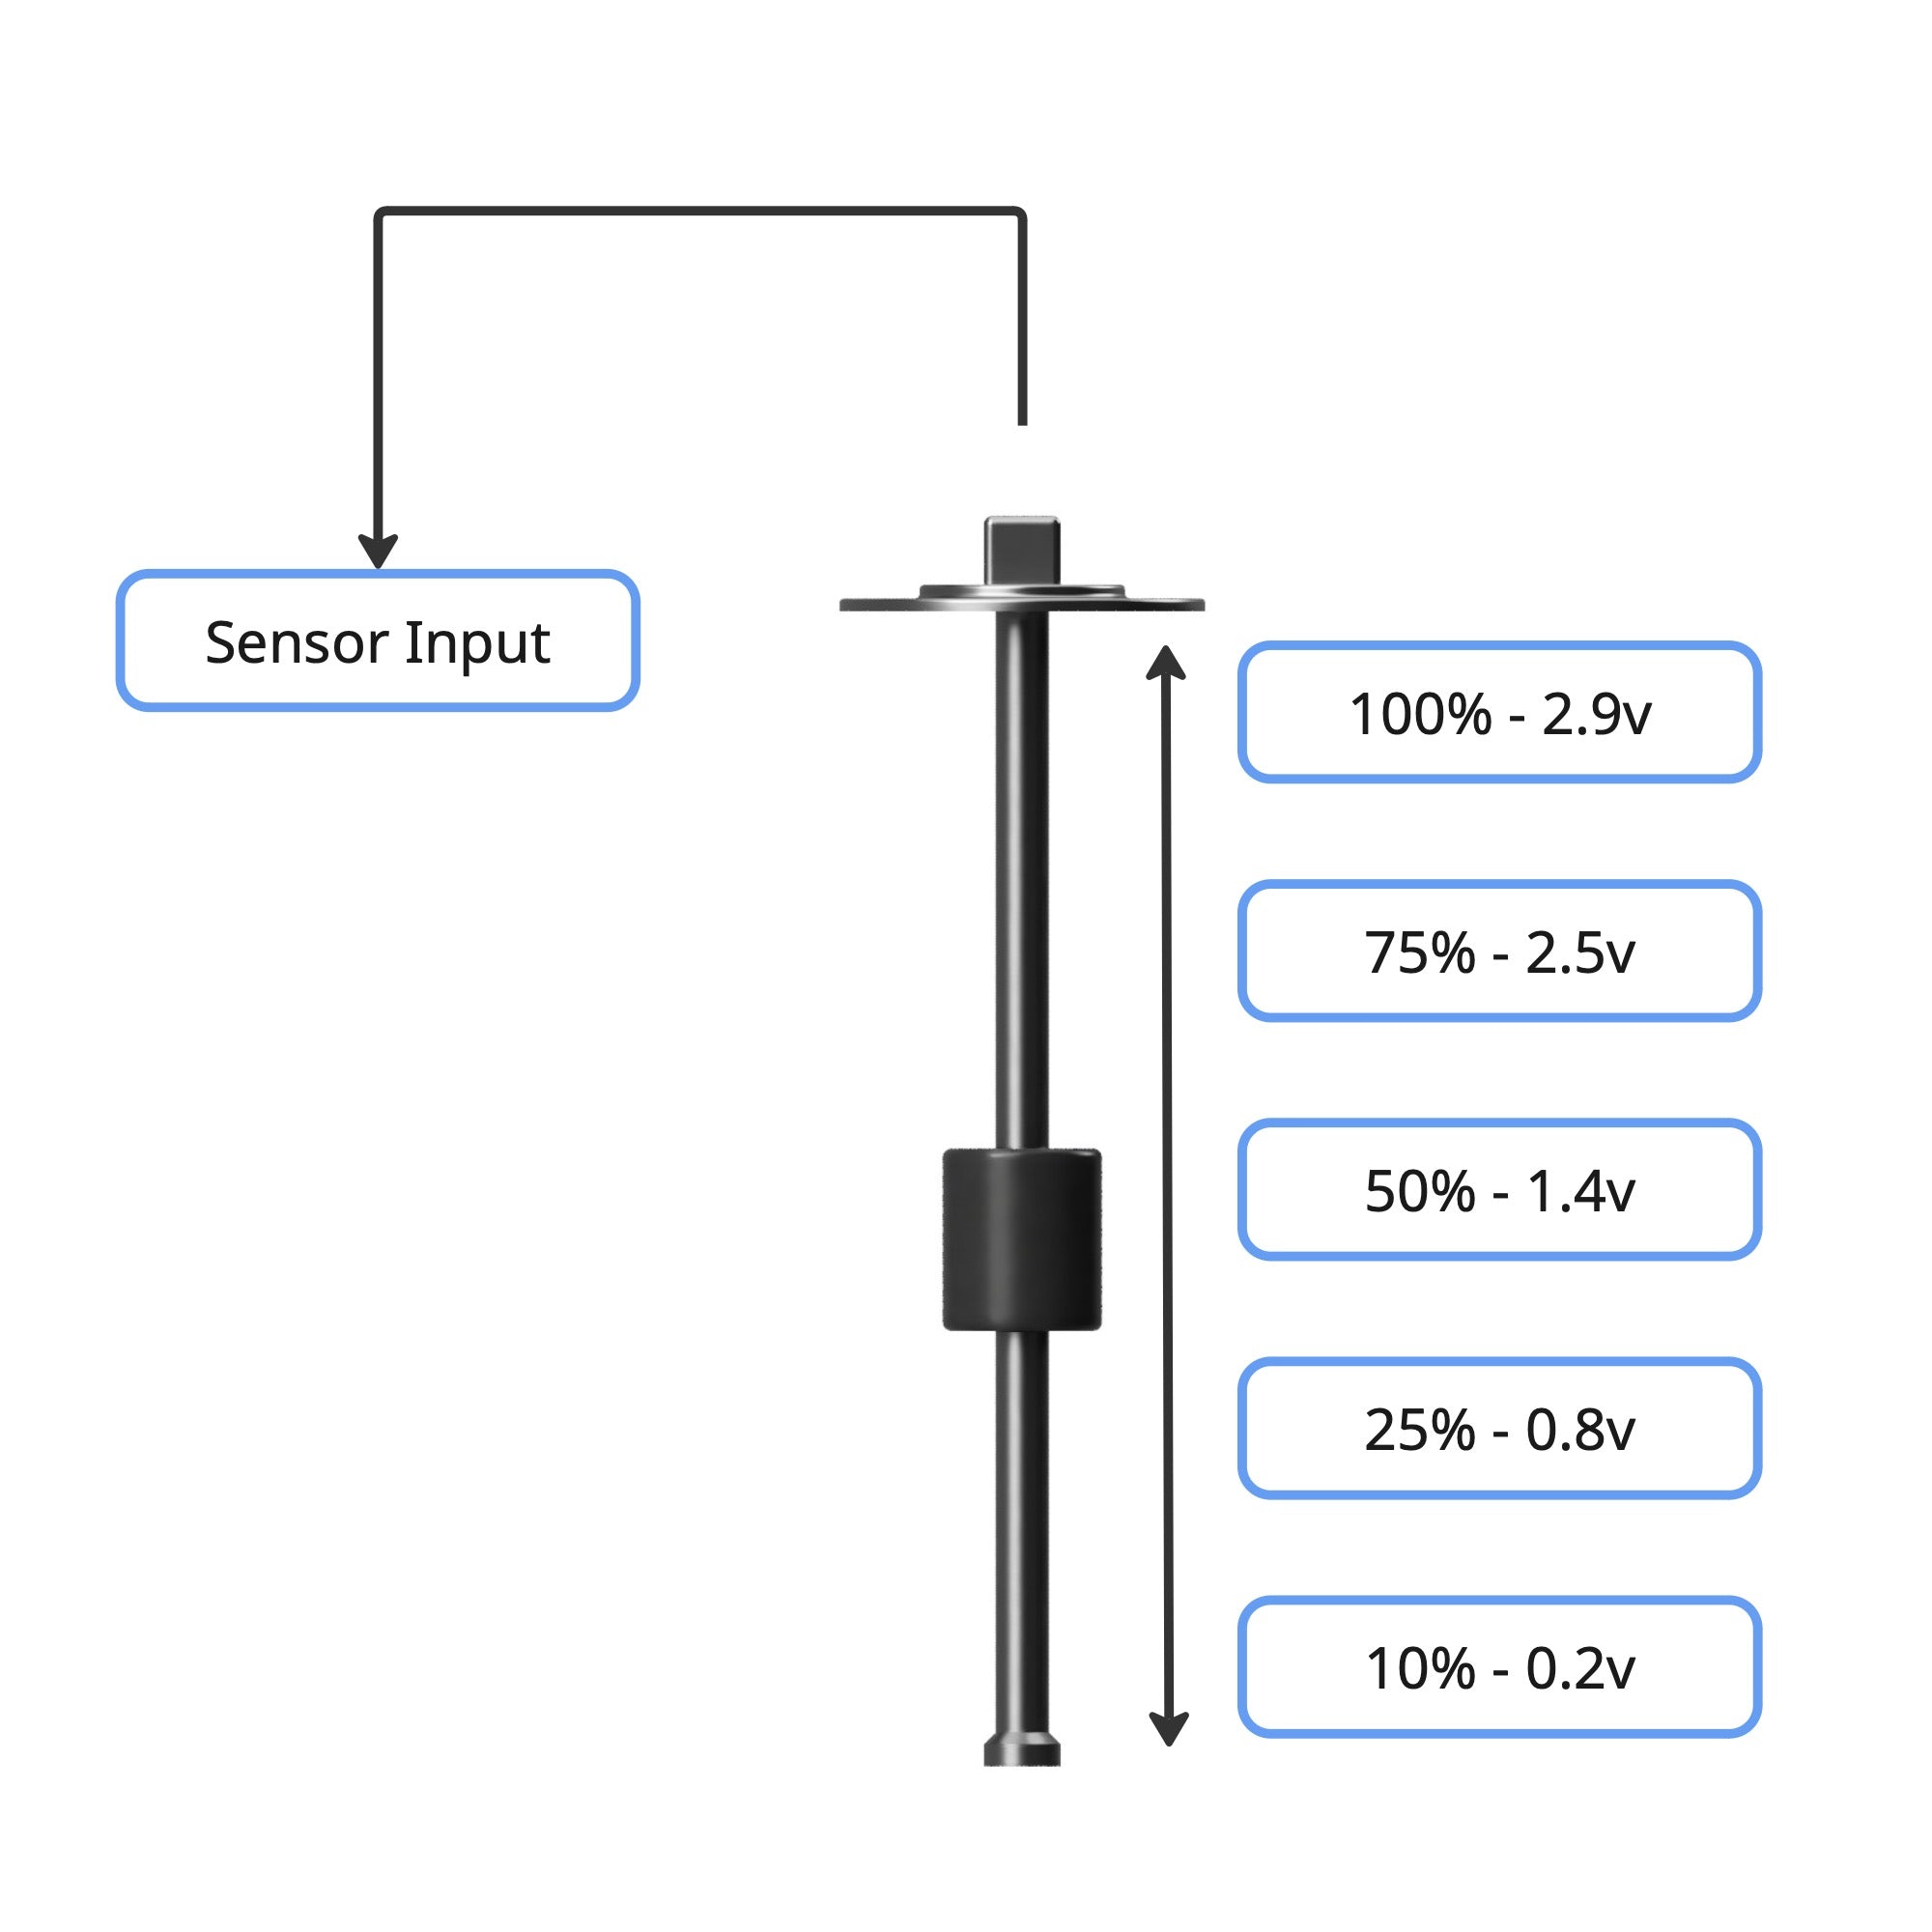
So to calibrate our sensor, we need to get the voltage reading at some known points so that the raw voltage value can be interpolated using them and we get some meaningful measurement we can use in our dashboard. 

The values used in the image are just an example and will very likely differ to the values your sensor will output at the same positions

Displaying the interpolated value

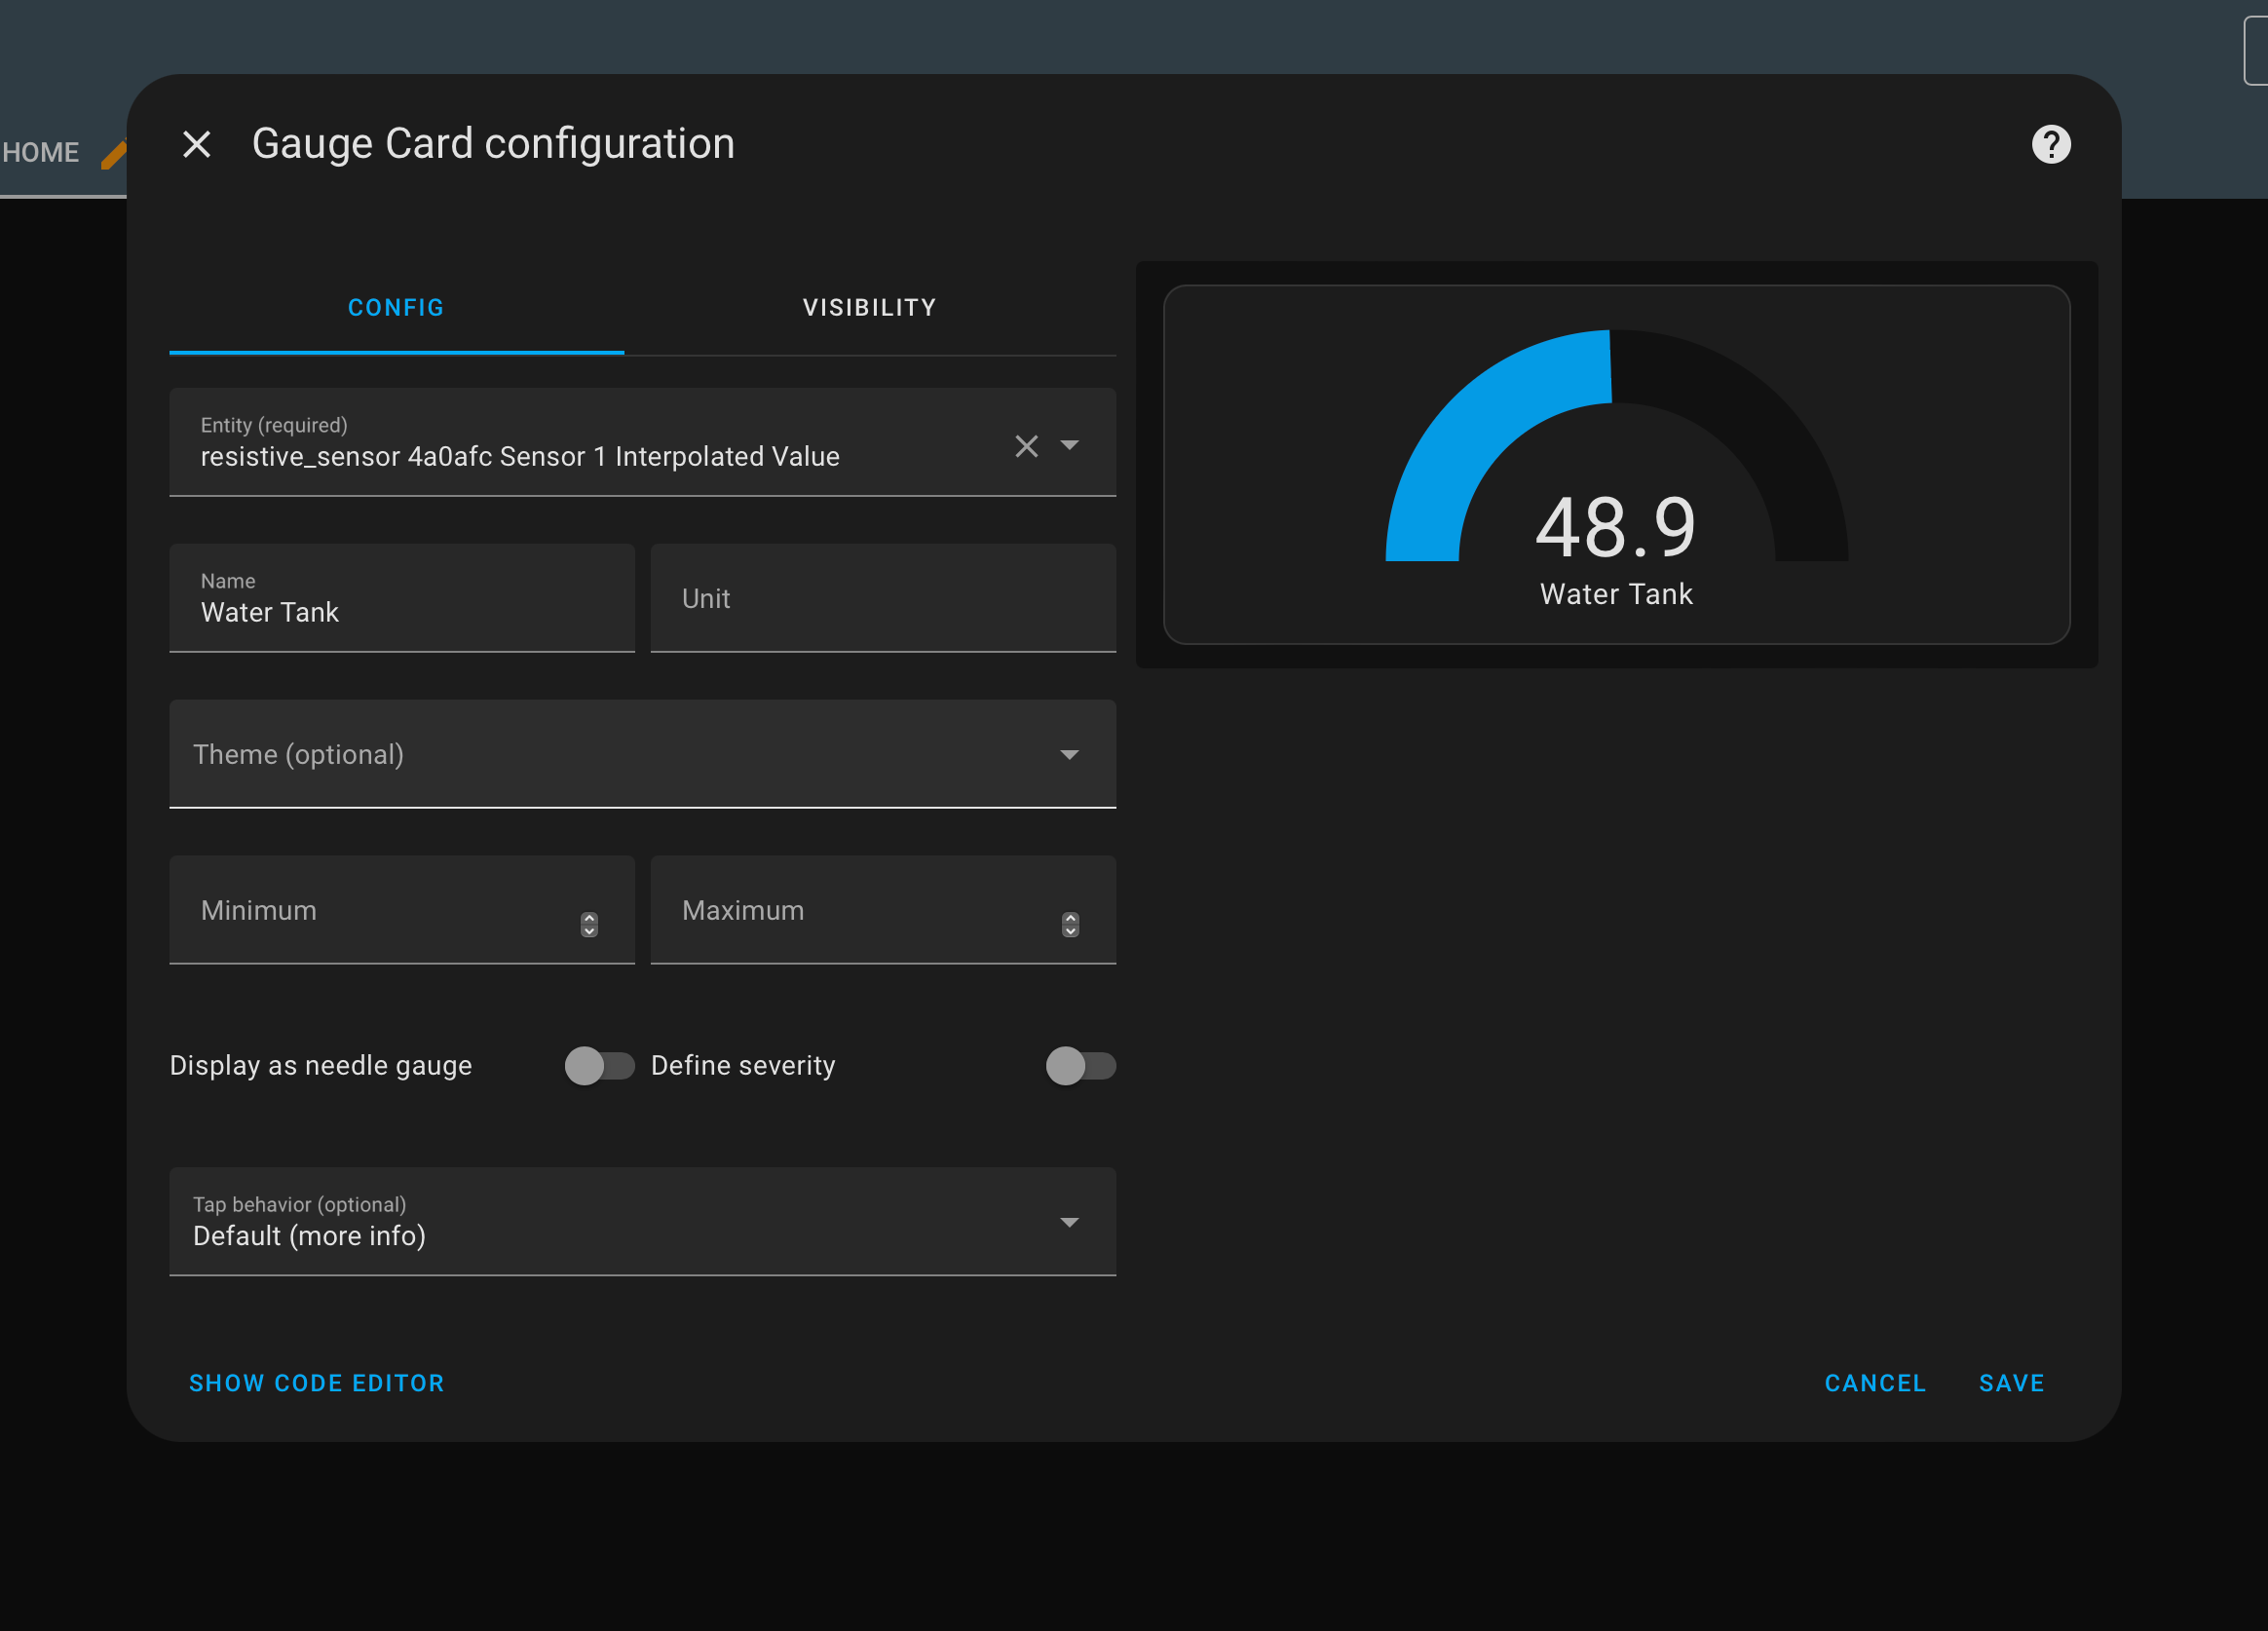
To display the interpolated value in your dashboard you can do so by using one of Home Assistants built in card such as the Gauge card.

When adding the Gauge card, simply use the entity search box and type "interpolated_value" and will filter the list down to the two interpolated_value entities for the device (sensor 1, sensor 2).

From within the editor window you can rename the sensor to however you like.

Config paramaters

Sensor

Sensor Raw

This is the raw voltage value measured by the sensor. This is affected by the internal variable resistance of your sensor as well as he internal resistance of the input module which can be configured using min/max resistance values in the config section, or in the custom card.

Interpolated Value

This is the value computed based on the raw value along with the interpolation points.

Note: This value will only be visible in HomeAssistant, in the device config page it will show as N/A as the interpolation in HomeAssistant, not the device.

Sensor input open

This is a binary entity that can be used to trigger when the voltage reaches a certain threshold.

Note: the threshold value can be configured in the config section

Sensor Config

Sensor min resistive

The minimum resistance level that your sensor will operate at. You will need to find out this information from your sensor spec sheet.

Sensor max resistance

The maximum resistance level that your sensor will operate at. You will need to find out this information from your sensor spec sheet.

Sensor open circuit voltage threshold

Raw voltage values less than the threshold value will result in "Sensor open circuit" being false. Once the raw voltage value exceeds this value it will be considered closed and have a value of true.

Interpolation points

These are all the points that are used to give an output value based on the raw voltage value. They will internally be stored in the format [[0.1,20],[0.5,40],[1.2,60],[1.5,70],[2.9,100]].

Note: it is recommended to use the custom card to manage these values

Internal resistor value

This is computed based on the min / max of your sensor that can be configured using the min and max inputs